Washing crib bumpers might seem simple and routine at first. Yet studies show that incorrect cleaning techniques can leave behind up to 70 percent of irritants or residues, even after a full wash. Most parents miss the critical details that can make the difference between a safe nursery and hidden risks. One overlooked step could change everything you thought you knew about keeping your baby’s bedding fresh—and it all starts before you even turn on the washing machine.
Table of Contents
- Step 1: Gather Your Supplies For Washing Crib Bumpers
- Step 2: Remove Crib Bumpers And Check Care Labels
- Step 3: Pre-Treat Stains On Crib Bumpers
- Step 4: Wash Crib Bumpers In The Washing Machine
- Step 5: Air Dry Crib Bumpers For Safe Use
- Step 6: Inspect And Reattach Crib Bumpers
Quick Summary
| Key Point | Explanation |
|---|---|
| 1. Gather baby-safe cleaning supplies | Use gentle, non-toxic cleaners like mild detergent and white vinegar to protect your baby’s crib bumpers. |
| 2. Always check care labels | Inspect manufacturer care labels for specific washing instructions to maintain fabric integrity. |
| 3. Pre-treat stains carefully | Use a spot treatment of vinegar and water for organic stains, and a baking soda paste for tougher marks. |
| 4. Machine wash on gentle cycle | Use cold or lukewarm water on the gentlest cycle to protect the bumper during cleaning. |
| 5. Air dry to prevent damage | Lay bumpers flat in a well-ventilated area to maintain their shape and prevent fabric deterioration. |
Step 1: Gather Your Supplies for Washing Crib Bumpers
Preparing to wash your crib bumpers naturally begins with assembling the right cleaning supplies and understanding the unique fabric requirements. Your goal in this first step is to collect everything needed for a safe and effective cleaning process that preserves the integrity of the delicate nursery item.
Start by selecting gentle, baby-safe cleaning agents that will not harm the fabric or leave harsh chemical residues. White vinegar, mild unscented liquid detergent, and baking soda become your primary natural cleaning allies. You will want to choose products specifically designed for infant textiles, avoiding bleach or strong synthetic cleaners that could damage the bumper’s material or potentially irritate your baby’s sensitive skin.
Essential supplies for natural crib bumper washing include:
- Large basin or clean bathtub
- Soft white cloth or sponge
- White vinegar
- Mild liquid detergent
- Baking soda
- Clean white towels
- Drying rack or flat surface with good air circulation
Before beginning the washing process, carefully inspect the crib bumper for any specific manufacturer instructions. Some specialized fabrics or decorative elements might require unique handling techniques. Read more about maintaining delicate nursery textiles to ensure you approach the cleaning with precision and care.
Pay special attention to the bumper’s material composition. Cotton, polyester, and blended fabrics each respond differently to washing techniques. Gather your supplies in a clean, organized workspace where you can methodically approach the cleaning process without interruptions. Having everything prepared in advance will make the entire washing experience smoother and more efficient, helping you maintain your baby’s nursery items in pristine condition.
Here is a summary table of the essential tools and materials mentioned for natural crib bumper washing, including their purpose and important notes.
| Item | Purpose | Notes |
|---|---|---|
| Large basin or bathtub | Soak or pre-wash bumpers | Should be clean and free from any residues |
| Soft white cloth/sponge | Gentle cleaning and stain pre-treatment | Prevents fabric abrasion |
| White vinegar | Natural cleaning and deodorizing agent | Used for stain pre-treatment and softening |
| Mild liquid detergent | Main cleaning agent | Ensure it is unscented and baby-safe |
| Baking soda | Remove tough stains, deodorize | Used as a paste for stubborn marks |
| Clean white towels | Absorb moisture after washing, drying aid | Use to support or blot the bumper |
| Drying rack/flat surface | Air drying the bumper | Must have good air circulation |
Step 2: Remove Crib Bumpers and Check Care Labels
Removing crib bumpers requires careful attention and a systematic approach to ensure you protect both the fabric and the delicate attachment points. Begin by gently untying or unhooking the bumpers from the crib, taking care not to strain or tear the fabric connections. Work methodically, starting from one corner and moving around the entire crib perimeter to maintain the bumper’s structural integrity.
Carefully examine the manufacturer’s care label, which provides critical instructions specific to your bumper’s fabric composition and recommended cleaning methods. These labels are typically located along a seam or inner edge and contain essential information about washing temperature, recommended detergents, and potential fabric restrictions. Learn more about proper nursery textile maintenance to understand the nuances of specialized infant bedding care.
Pay close attention to potential washing limitations that might impact your cleaning process. Some crib bumpers require specialized handling:
- Delicate embroidered sections
- Decorative trim or appliques
- Specific fabric blends that need gentle treatment
As you remove the bumpers, conduct a preliminary inspection for any existing damage, loose threads, or areas of significant wear. This pre-washing assessment helps you determine whether the bumper requires professional cleaning or can be safely washed at home. Some intricate or heavily soiled bumpers might need specialized textile cleaning services to maintain their quality and appearance.
Verify that you have completely detached the bumper from all crib attachment points, creating a clean, flat surface ready for the subsequent washing process. By carefully removing the bumpers and thoroughly reviewing their care instructions, you set the foundation for a safe and effective natural cleaning method that preserves the bumper’s quality and your baby’s comfort.
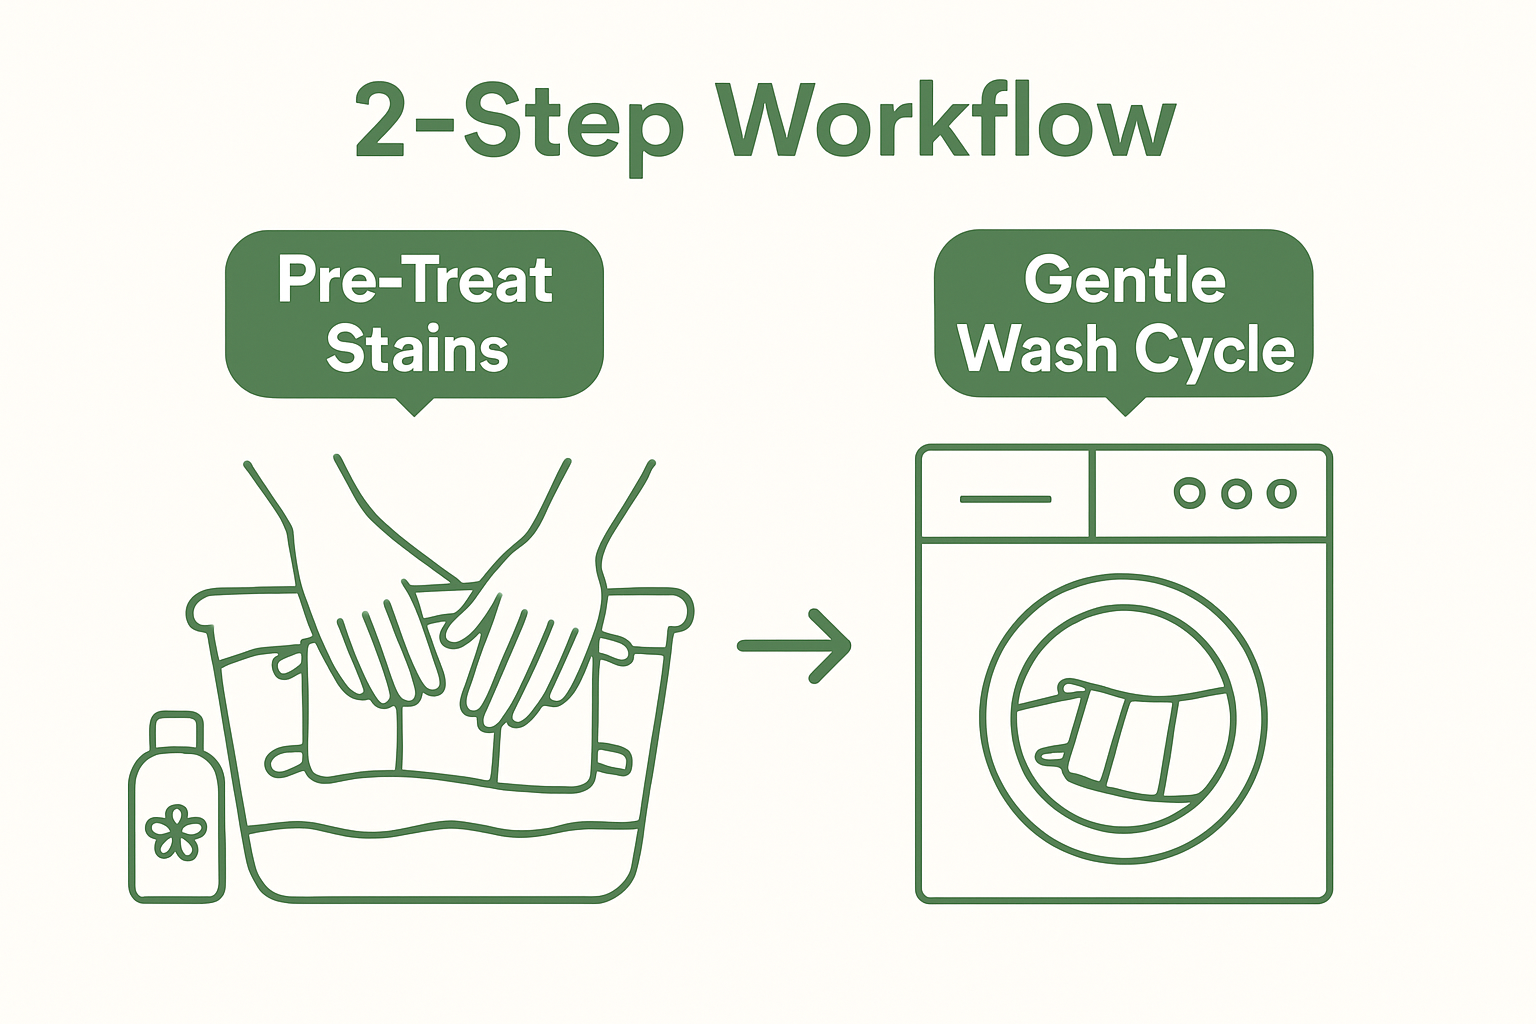
Step 3: Pre-Treat Stains on Crib Bumpers
Pre-treating stains on crib bumpers requires a delicate touch and strategic approach to preserve the fabric’s integrity while effectively removing unwanted marks. Baby-related stains like formula, drool, food spills, and diaper leakages demand specialized treatment that goes beyond standard washing techniques. Understanding the type of stain and the bumper’s fabric composition becomes crucial in this step.
For organic stains like milk or food, create a natural pre-treatment solution using white vinegar and warm water. Mix equal parts of these ingredients in a clean spray bottle, which allows for precise application without oversaturating the fabric. Gently dab the stained area with a soft white cloth, working the solution into the fabric using light, circular motions. Avoid aggressive rubbing, which could damage delicate fibers or spread the stain further. Learn more about protecting your nursery textiles to understand the importance of careful fabric maintenance.
Key natural stain pre-treatment strategies include:
- Immediate spot treatment within 15 minutes of staining
- Using enzyme-based natural cleaners for protein-based stains
- Allowing pre-treatment solutions to sit for 5-10 minutes before washing
For tougher stains like dried formula or accumulated dirt, create a paste using baking soda and water. Apply this mixture sparingly to the stained area, allowing it to sit for approximately 10 minutes before gently wiping away with a damp cloth. The mild abrasive nature of baking soda helps lift stubborn marks without compromising the fabric’s color or texture.
Remember that patience and gentle technique are your best tools during stain pre-treatment. By taking time to carefully address each mark and using natural, baby-safe solutions, you protect both the bumper’s appearance and its long-term durability.
 The goal is not just removing the stain, but doing so in a way that maintains the bumper’s original quality and ensures a safe environment for your little one.
Step 4: Wash Crib Bumpers in the Washing Machine
Washing crib bumpers in the machine requires a precision approach that balances thorough cleaning with fabric preservation. Gentle cycles and appropriate water temperatures become your primary strategy for maintaining the bumper’s quality and protecting delicate textile fibers. Before loading the bumper, double-check that all ties, fasteners, and decorative elements are secured to prevent potential damage during the washing process.
Machine washing parameters for natural fabric care involve selecting the most delicate cycle available, typically labeled as “gentle” or “hand wash.” Use cold or lukewarm water to prevent color fading and fabric shrinkage. Your detergent selection plays a critical role choose a mild, fragrance-free liquid detergent specifically designed for infant textiles. Explore more about nursery textile maintenance to understand comprehensive fabric care techniques.
Essential machine washing guidelines include:
- Use cold or lukewarm water (below 30 degrees Celsius)
- Select the gentlest machine cycle
- Add a half cup of white vinegar as a natural fabric softener
- Avoid using bleach or harsh chemical additives
To protect the bumper from excessive agitation, consider placing it inside a large mesh laundry bag or pillowcase. This additional layer creates a protective barrier that minimizes direct contact with the washing machine’s drum, reducing potential fabric stress. If your bumper is particularly delicate or features intricate embroidery, hand washing might be a safer alternative to machine cleaning.
Once the wash cycle completes, remove the bumper promptly to prevent potential wrinkle formation or moisture retention. Gently reshape the fabric while it is still damp, ensuring that no areas are stretched or distorted during the process. Your careful approach during this washing stage will help maintain the bumper’s original texture, color, and structural integrity, preserving a clean and safe environment for your baby.
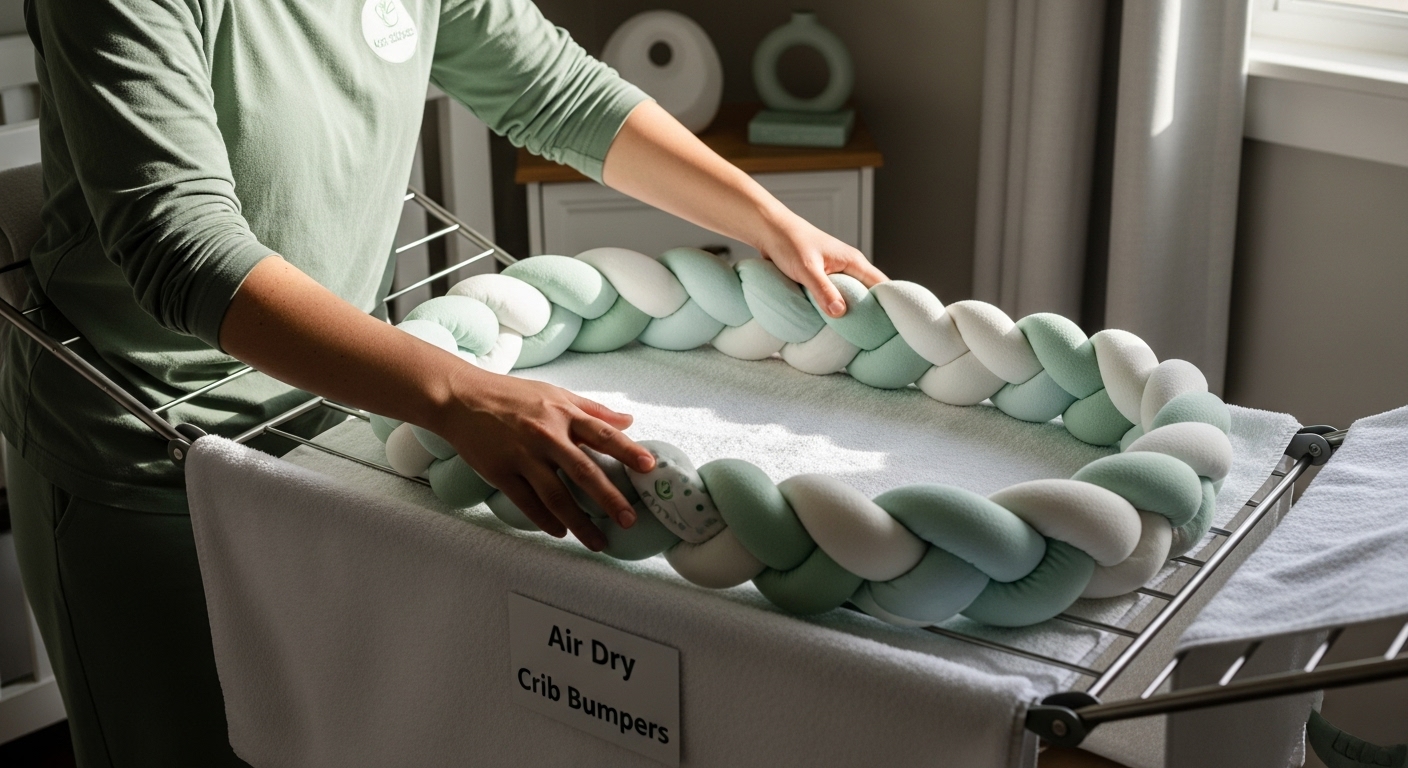
Step 5: Air Dry Crib Bumpers for Safe Use
Air drying crib bumpers is a critical final step that ensures your baby’s bedding remains in optimal condition while preventing potential fabric damage from high heat. Proper drying techniques are essential for maintaining the bumper’s structural integrity, color, and overall quality. Unlike machine drying, which can cause shrinkage and fabric stress, air drying provides a gentle method that preserves the delicate textile fibers.
Choose a well-ventilated area with indirect sunlight for optimal drying conditions. Direct sunlight can fade colors and weaken fabric fibers, so select a location that offers consistent air circulation without intense direct light. A collapsible drying rack positioned near an open window or in a well-ventilated room works perfectly. Explore more about maintaining nursery textiles safely to understand comprehensive fabric care strategies.
Key air drying guidelines for crib bumpers include:
- Lay the bumper flat to prevent stretching
- Reshape the fabric gently while damp
- Ensure complete air circulation around the entire bumper
- Avoid hanging by corners to prevent fabric distortion
When positioning the bumper, spread it out evenly to allow maximum air exposure. Use clean white towels underneath to absorb excess moisture and provide additional support. Gently reshape the bumper periodically during the drying process to maintain its original form and prevent any potential misshaping. Depending on humidity levels, drying can take anywhere from 12 to 24 hours, so patience is key.
Carefully inspect the bumper once completely dry, checking for any remaining moisture, unusual odors, or potential fabric issues.
 The bumper should feel completely dry to the touch, with no dampness or stiffness. By following these meticulous air drying techniques, you ensure a clean, safe, and perfectly preserved crib bumper ready to provide comfort and protection for your little one.
Step 6: Inspect and Reattach Crib Bumpers
Inspecting and reattaching crib bumpers is a crucial final step that ensures your baby’s sleeping environment remains safe, clean, and structurally sound. Careful examination of the bumper after washing becomes paramount, as this process allows you to identify any potential wear, damage, or structural weaknesses that might compromise the bumper’s functionality or safety.
Begin your inspection by spreading the bumper on a clean, flat surface with excellent lighting. Look meticulously for signs of fabric stress such as thin spots, loose threads, fraying edges, or any areas where the fabric seems weakened. Pay special attention to the attachment ties and fastening mechanisms, ensuring they remain strong and intact. Learn more about maintaining nursery safety standards to understand comprehensive textile care and safety protocols.
Critical inspection points for crib bumpers include:
- Check for loose or broken stitching
- Examine attachment ties for strength and integrity
- Look for color fading or fabric thinning
- Verify no residual stains remain after washing
When reattaching the bumper, work systematically around the crib, ensuring each tie is securely fastened and evenly distributed. The bumper should sit smoothly against the crib rails without significant bunching or excess slack. Gently tug each attachment point to confirm its stability, making certain that no single tie bears excessive tension that could cause fabric distortion or potential safety risks.
According to safety guidelines from the Consumer Product Safety Commission, thoroughly verifying the bumper’s condition before reinstallation is essential. If you notice any significant damage or wear that might compromise the bumper’s structural integrity, consider replacing it to maintain the highest safety standards for your infant’s sleeping environment. Your meticulous attention during this final inspection stage ensures a clean, safe, and comfortable nursery setting.
This checklist table helps ensure your crib bumper is ready to be safely reattached by reviewing key inspection points after cleaning.
| Inspection Point | What to Look For | Complete (✓/✗) |
|---|---|---|
| Loose or broken stitching | Check seams and edges for security | |
| Attachment ties intact | Confirm all ties or fasteners are secure | |
| Fabric thinning or color fading | Look for weakened or faded areas | |
| Stains successfully removed | Verify no visible marks remain | |
| Structural integrity maintained | Ensure bumper sits flat, not misshapen | |
| Odor and moisture check | Bumper should be dry and fresh |
Choose a Safer, Cleaner Nursery With Kari Studio
Are you spending too much time struggling to keep your baby’s crib bumper clean while worrying about safety and delicate fabrics? If this guide has shown you how tricky it can be to find natural cleaning solutions for sensitive nursery items, imagine having bumpers that are thoughtfully designed for both easy care and long-lasting protection. At Kari Studio, our Handmade Bumper Pads for Girl Cot and Handmade Bumper Pads for Boy Cot are crafted to meet the highest standards for washability, comfort, and safety. No more stress about pre-treating stains or worrying about fabric fading—our bumpers are made for real-life parenting demands.
Take the next step in keeping your nursery both beautiful and practical. Visit Kari Studio’s collection of braided crib bumpers to find high-quality crib bumpers that are easy to care for and perfect for your baby’s safe sleep. Shop now to bring home peace of mind and enjoy an effortless cleaning routine from day one.
Frequently Asked Questions
How do I choose the right cleaning agent for washing crib bumpers?
Select baby-safe, gentle cleaning agents like white vinegar, mild unscented liquid detergent, and baking soda to avoid harmful residues. Avoid bleach or harsh chemicals that could irritate your baby’s skin.
What should I check before washing crib bumpers?
Inspect the manufacturer’s care label for specific washing instructions, fabric composition, and any special handling requirements that might be necessary for your crib bumper.
How can I effectively pre-treat stains on crib bumpers?
For organic stains, use a mixture of equal parts white vinegar and warm water applied gently with a soft cloth. For tougher stains, a baking soda paste can be effective after allowing it to sit for about ten minutes.
What are the best practices for air drying crib bumpers?
Air dry crib bumpers in a well-ventilated area away from direct sunlight to prevent fading. Lay them flat to avoid stretching and reshape them periodically during the drying process.
Recommended
- How can you maintain and clean a braided crib bumper to ensure it rema – KariStudio
- How to Install and Secure a Braided Crib Bumper: Essential Tips for Ne – KariStudio
- Eco-Friendly Braided Crib Bumpers: Sustainable Choices for Your Baby’s – KariStudio
- What factors should you consider when choosing the right braided crib – KariStudio